Saturday, September 21, 2013

Speed Net 4.0 Upgradation Procedure

Step by Step Procedure to Update Speed 4.0

Download Speed Net 4.0 from CEPT, Mysore - FTP

Download all files listed above i.e Speednet 4.0 ReadMe.txt , SpeedOne Installer.exe, SpeedOne Updater.exe.


Read carefully Speednet 4.0 ReadMe.txt file. If time not permits to read kindly follow the instruction below

SpeedOne Updater: execute from Server - It contains Scripts and DB Updates and Speed Net Client 4.0 Software updates for server.

1. No need to run from Client PC.
2. One time Execution is enough.
3. Auto execution and Updation added.

SpeedOne Installer: It contains SpeedNet Client/ Server/ Communication updates.

1. Take backup of SpeedNet Communication and server folder.

2. Un-install Speed Net Communication and SpeedNet Server Component from your machine.

3. Execute SpeedOne Installer from C:\ (or) D:\ (or) E:\ drive

4. Now Select and Install / update SpeedNet 4.0.

Note: No Need to execute  SpeedOne Installer > SpeedNet Client from Server if already updated using SpeedOne Updater. 
- See more at: http://potools.blogspot.in/2013/09/speed-net-40-upgradation-procedure.html#sthash.pao5I4CS.dpuf

Speed Net 4.0 Article Prefix Error

Problem: While booking Speed Post BNPL article booking at SpeedNet module it shows Article prefix error.. This Article Prefix is not allotted to your circle - 


Solution: Go to Speed Net Supervisor > Master > Circle wise Barcode > Click on Update Now we can book BNPL Articles without prefix problem...

Monday, September 16, 2013

SpeedNet 4.0 Issues & Solutions ( Invalid use of Null )

SpeedNet 4.0 Issues & Solutions ( Invalid use of Null )

Written By Admin on 16 September 2013 | Monday, September 16, 2013


After speednet 4.0 updated(Official release Setup) in Some Offices, while closing the bags in Speed Net 4.0, it get exit when the print option is given and dispatching the bags also showing the error "Invalid use of Null". . The error Screenshot is attached herewith for your reference..


PTC Sent the Solution for above issues. 


Solutions: Download


a) Run the attached EXL files (first run OfficeName_NullSolution.exl and then OfficeMaster_DataUpdation_Soln.exl) using ScriptTool.exe after taking full database backup.

b) Download the Office Data of your Circle from SPC site and update this data through SpeedNet Communication.

c) Under Supervisor --> Master --> Offices --> Add Additional Offices --> Click on "UPDATE OFFICES DATA" button.

In case the desired office is not appearing in Close Bag option even after performing the above steps, then they needs to do the following steps:

a) Under Supervisor --> Master --> Offices --> Add Additional Offices --> Enter the PinCode of the desired office and Click on "Fetch" button.

b) All Offices having said PinCode will be displayed. Select the office and Click on "Add" button.

Further to the above steps, run the attached EXL file (Offices Update (Update OfficeName replacing OfficeCode).exl) using ScriptTool.exe


Thanks to
P.Silambarasan
DSM,Theni Division ..
Mobile : +91 9842031341

Thursday, August 29, 2013

RPC error query

Problem : After instollation SQL Express and M.M.7.0 


1. RPC errore while submitting  POS Submit account 
2. Error Message like " MSDTC SERVICES IS NOT RUNNING "


Solution :
1.

exec sp_serveroption @server='myserver', @optname='rpc', @optvalue='true'
exec sp_serveroption @server='myserver', @optname='rpc out', @optvalue='true'


Note:  Replace 'myserver' with your servername in the above query.


2. Go to Services (Control Panel-- Administrative Tools--Services ) and then start the service 'Distributed Transaction Coordinator' (MSDTC) with start up type as 'Automatic' and Log On As 'Network Service' as shown in the attachment.   Then execute the below mentioned Query relating to 'RPC' error to solve the problem.

Delete Duplicate Query

For Speednet
use pospcc
UPDATE  DeliveryReturns
SET     RemarkCode='1'

For Postman
USE POSTMAN
UPDATE      RegDeliveryMaster
SET             DeliveryOrDespatchDate =TransDate
UPDATE       RegDeliveryReturns
SET              Action ='0',ReasonCode='1'

USE POSTMAN
UPDATE      ParDeliveryMaster
SET             DeliveryOrDespatchDate =TransDate
UPDATE       ParDeliveryReturns
SET              Action ='0',ReasonCode='1'

USE POSTMAN
UPDATE      MoDeliveryMaster
SET             DeliveryOrDespatchDate =TransDate
UPDATE       MoDeliveryReturns
SET              Action ='0',ReasonCode='1'
-------------------------------------------------------------------
For Speednet
use pospcc
UPDATE  DeliveryMaster
SET          DeliveryOrDespatchDate=Transdate
WHERE   (DeliveryOrDespatchDate IS NULL)
 
For Postman
USE POSTMAN
UPDATE      RegDeliveryMaster
SET             DeliveryOrDespatchDate =TransDate
UPDATE       RegDeliveryReturns
SET              [Action] ='0',REASONSCODE='1'

Tuesday, October 2, 2012

Revision of Speed Post Tariff.


Kindly find enclosed herewith a copy of CO Mumbai L. No. BD/SP/Corrs/2011-12 dated 25th September 2012 along with Directorate N.Delhi DO L. No. 57-06/2011-BD & MD (pt) dated 21.09.2012 on the subject.

Considering the market rates of the express industry and the cost of operations of Speed Post, the Speed Post tariff are being revised as follows with effect from 01st October 2012.

Weight
Local (within municipal limits)
Upto 200 Kms
201 to 1000 Kms
1001 to 2000 Kms
Above 2000 Kms
Upto 50 Grams
Rs. 15/-
Rs.35/-
Rs. 35/-
Rs.35/-
Rs.35/-
51 Grams to 200 Grams
Rs. 25/-
Rs.35/-
Rs.40/-
Rs.60/-
Rs.70/-
201 grams to 500 grams
Rs.30/-
Rs. 50/-
Rs.60/-
Rs.80/-
Rs.90/-
Additional 500grams or part thereof
Rs.10/-
Rs. 15/-
Rs.30/-
Rs.40/-
Rs.50/-

The above tariff will be exclusive of taxes. The taxes will have to be paid extra as notified by the Central Government from time to time.

CEPT Mysore will issue a patch for revising the Speed Post tariff. On receipt of the same, all concerned will download the same and update in point of sale etc. immediately.
You are requested to bring it to the notice of all concerned including BNPL customers in the divisions.

InternationalParcel_TariffUpdation.exe


Click on the following link to update the international Parcel tariff.

Download exe

Monday, May 21, 2012

CBS Phase I-B


Login ID
nskcityso
golecolonyso
panchavtiso
hptcollegeso
gandhingarso
indestatso
cidcocolonyso
dwarkaso
ispso
nskroadcampso
sinnarso
dindoriso
ojhartsso
waniso
devlalimdgso
igatpuriso


http://www.ptcinfo.org/cbsmonitoring/LOGIN.ASPX


For Division Office

Userid - cbs

Password - indiapost

Monday, April 23, 2012

The Error message displayed while running the Patch for SP User

The Error message displayed while running the Patch for SP User


Solution :

Go to Registry ( Regedit in the Run )

Check the following path

[HKEY_LOCAL_MACHINE\SOFTWARE\POST\CONNECTION]

Double Click the Server name and Give value data as ( Your SQL Server name)

"Servername"="DOP"

Eg. Here Your Server name = DOP )

Sunday, March 18, 2012

How To Set Password in Broad bandModem

Here is the step by step method to set password in modem..Setting password in the modem is a must to connect broad band modem to a hub or a switch


Before we proceed, first we need to ensure that we are connecting the Modem to the Phone line and computer.
1. Turn ON the Modem. You can find the Power button is at the rear of the Modem. Once the Modem is Turned ON, the Power Button LED at the front will glow.
2. Connect the Phone Line cable to the LINE port at the rear of the Modem.
3. Connect Modem to the Computer. Connect a LAN cable (Network cable/RJ45) from Modem to the LAN port (Network Port) of your computer.
4. Once all connection is proper, we can proceed to next step.


Configure Modem to enable Internet through LAN and Wi-Fi (WLAN):


Follow below said step by step procedure to configure the BSNLWA3002G4 broadband modem to access Internet from your Desktop and from Laptop (via Wi-fi) at the same time.

1. Open Internet Explorer, type (Or type 192.168.1.1) and press the Enter key on the keyboard.
2. Now a popup screen asks you to enter ID and password to configure your Siemens SL2_141 broadband modem as shown below.


3. Enter below said User name and Password. (Use the default factory user name and password) and click OK.
User name: admin
Password: admin
4. Once you login, you will be at the Device Info page as shown below


5. Click on Advanced Setup link on left pane of the window as shown below


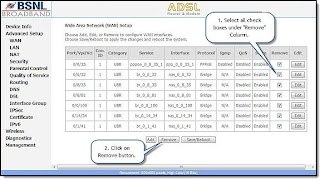
6. Select all the boxes under the Remove column and click on Remove button to remove all factory settings. Check the below said screenshot to understand better.

7. Once you click remove button, all the factory values will be removed from the modem. Now the screen will look the one provided below.

8. Please Refresh the page by pressing the F5 button on the keyboard. The new window will look the one provided below.


9. Click on Quick Setup on the left pane of the window. You will be at Quick Setup page
10. Then set VPI and VCI values as shown below.
VPI = 0
VCI = 35


11. Then click on Next button. You will be at Connection Type page.
12. Select PPP over Ethernet (PPPoE), also select Encapsulation Mode = LLC/SNAP- BRIDGINGas shown below. Then click on Next button.


13. On the next page, enter below said details.
PPP Username: Username provided by BSNL.
PPP Password:
password provided by BSNL (default password is password)
PPPoE Service Name:
Leave this BLANK (though I used my name SiRu or dataone)
Authentication Mode:
AUTO

14. You can also select “Enable “Bridge PPPoE Frames Between WAN and Local Ports” option.
15. Then click on Next button.
16. Now you will be at Network Address Translation Settings page.
17. Change the below said settings:
Enable NAT = Yes
Enable Firewall = Yes
Enable IGMP Multicast = Yes
Enable WAN Service = Yes
Service Name = pppoe_0_35_1 or similar name (Do not change it)


18. Click on Next button. Now you will be at Device Setup page as shown below.
19. In this window, select Enable DHCP Server and click Next button


20. Now you will be at Wireless – Setup page.
21. Select Enable Wireless, also enter a name for your Wireless (SSID). (Note: I used “SiRu Wi-Fi” as an example)
22. Then click on Next button


23, Now you will be at WAN Setup – Summary page. Click on Save/Reboot button to reboot you modem.


24. It may take 1-2 minutes for the changes to take affect. Close the Internet Explorer browserwindow now.


25. Congratulations. You have successfully configured both Ethernet and Wireless Internet on BSNL Broadband ADSL Modem.


Thanks to SA Tirur for this useful Post.